# Data Collector for Chaincode
# NodeJS
# Hyperledger Fabric 2.x or above
# Requirements
# Installation
- Using npm:
npm install @ravenpod/ravenpod-cc-dc
- In your chaincode contract directory, simply
requirethe Ravenpod data collector with the access and secret access key in the beginning of the index.js
// index.js
'use strict';

require('@ravenpod/ravenpod-cc-dc')(
    ['vaccine'], // Array of chaincode contract filename to be instrumented
    {
        accessKey: 'YOUR ACCESS KEY',
        secretAccessKey: 'YOUR SECRET ACCESS KEY'
    }
)

const Vaccine = require('./lib/vaccine');

module.exports.Vaccine = Vaccine;
module.exports.contracts = [ Vaccine ];
# Hyperledger Fabric 1.4.x
# Requirements
# Installation
- Using npm:
npm install @ravenpod/ravenpod-cc-dc@fabric14
- In your chaincode contract directory, simply
requirethe Ravenpod data collector with the access and secret access key in the beginning of the index.js. However, if you are using the old programming model (opens new window), skip this step and go to step 3.
'use strict';

require('@ravenpod/ravenpod-cc-dc')(
    ['vaccine'], // Array of chaincode contract filename to be instrumented
    {
        accessKey: 'YOUR ACCESS KEY',
        secretAccessKey: 'YOUR SECRET ACCESS KEY'
    }
)

const Vaccine = require('./lib/vaccine');

module.exports.Vaccine = Vaccine;
module.exports.contracts = [ Vaccine ];
- For chaincode adopting the old programming model like this (opens new window), follow these steps:
You will be using the following the file/directory structure to enable the data collector. Let's create a JS file called rpdc.js.
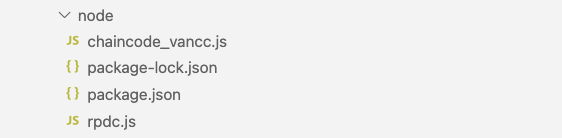
// rpdc.js
const rpdc = require('@ravenpod/ravenpod-cc-dc')
rpdc.newDataCollector([],
{
    accessKey: 'YOUR ACCESS KEY',
    secretAccessKey: 'YOUR SECRET ACCESS KEY'
})
require('./chaincode_vancc.js')
Next, modify package.json to invoke rpdc.js when the chaincode container is started.
// package.json
"scripts": {
    "start": "node rpdc.js"
},
Finally, add the following lines in your chaincode to let Ravenpod start instrumentating it.
// chaincode_vancc.js
var Chaincode = class {
    // Your chaincode content here...
}

var cc = new Chaincode();

// RAVENPOD
// Here we create an instance of Ravenpod data collector and start instrumentating it.
const rpdc = require('@ravenpod/ravenpod-cc-dc')
rpdc.instrumentChaincode(Chaincode, cc)
// RAVENPOD

shim.start( cc );
# TypeScript
# Hyperledger Fabric 2.x or above
# Requirements
# Installation
- Using npm:
npm install @ravenpod/ravenpod-cc-dc
- In your chaincode contract directory, simply
requirethe Ravenpod data collector with the access and secret access key in the beginning of the index.ts
// index.ts
import ravenpod = require("@ravenpod/ravenpod-cc-dc");
ravenpod(
    ['fabcar'], // Array of chaincode contract filename to be instrumented
    {
        accessKey: 'YOUR ACCESS KEY',
        secretAccessKey: 'YOUR SECRET ACCESS KEY'
    }
)
import { FabCar } from './fabcar';

export { FabCar } from './fabcar';
export const contracts: any[] = [ FabCar ];
# Hyperledger Fabric 1.4.x
# Requirements
# Installation
- Using npm:
npm install @ravenpod/ravenpod-cc-dc@fabric14
- In your chaincode contract directory, simply
requirethe Ravenpod data collector with the access and secret access key in the beginning of the index.ts. However, if you are using the old programming model (opens new window), skip this step and go to step 3.
// index.ts
import ravenpod = require("@ravenpod/ravenpod-cc-dc");
ravenpod(
    ['fabcar'], // Array of chaincode contract filename to be instrumented
    {
        accessKey: 'YOUR ACCESS KEY',
        secretAccessKey: 'YOUR SECRET ACCESS KEY'
    }
)
import { FabCar } from './fabcar';

export { FabCar } from './fabcar';
export const contracts: any[] = [ FabCar ];
- For chaincode adopting the old programming model like this (opens new window), follow these steps:
You will be using the following the file/directory structure to enable the data collector. Let's create a typescript file called rpdc.ts.
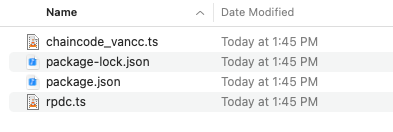
// rpdc.ts
import rpdc = require('@ravenpod/ravenpod-cc-dc')
rpdc.newDataCollector([],
{
    accessKey: 'YOUR ACCESS KEY',
    secretAccessKey: 'YOUR SECRET ACCESS KEY'
})
import ChaincodeVancc from "./chaincode_vancc"
Next, modify package.json to invoke ./dist/rpdc.js (assuming the tsc output directory is dist) when the chaincode container is started.
// package.json
"scripts": {
    "start": "node ./dist/rpdc.js"
},
Finally, add the following lines in your chaincode to let Ravenpod start instrumentating it.
// chaincode_vancc.ts
var Chaincode = class {
    // Your chaincode content here...
}

var cc = new Chaincode();

// RAVENPOD
// Here we create an instance of Ravenpod data collector and start instrumentating it.
import rpdc = require('@ravenpod/ravenpod-cc-dc')
rpdc.instrumentChaincode(Chaincode, cc)
// RAVENPOD

shim.start( cc );
# Go
# Hyperledger Fabric 2.x or above
# Requirements
Go is a compiled language, and doesn’t use a virtual machine. This means that setting up the data collector for your app requires you to use our integration package, which is a drop-in replacement for the Hyperledger Fabric Go Contract API. This will allow instrumenting your Go code to get the maximum benefits from the our Go data collector.
# Installation
- In your chaincode, replace your
importreferences togithub.com/hyperledger/fabric-contract-api-go/contractapiwithgithub.com/ravengit/fabric-contract-api-go/contractapi. For example:
Replace this:
import "github.com/hyperledger/fabric-contract-api-go/contractapi"
with this:
import "github.com/ravengit/fabric-contract-api-go/contractapi"
- Initialize the data collector by using the
NewDataCollector(string, string, DCOptions)function fromcontractapi. The first and second parameters are the your access key and secret access key respectively, the third parameterDCOptionsis a struct as defined below.NewDataCollectorreturns a reference to a data collector instance.
type DCOptions struct {
	Debug                  bool
	HashTrackingFunc       func(collection string, key string, data []byte) (string, string)
	DisableParam           bool
	DisableParamExceptions []string
}
Assign the data collector instance returned from
NewDataCollectorto your smart contract. You also need to assign theBeforeTransactionandAfterTransactionof your smart contract to the ones provided by our data collector.Create and start your chaincode as usual.
Sample code:
package main

import (
	"github.com/hyperledger/fabric-samples/asset-transfer-basic/chaincode-go/chaincode"
	"github.com/ravengit/fabric-contract-api-go/contractapi"
	"log"
)

func main() {
	// Enable Ravenpod Data Collector
	contract := chaincode.SmartContract{}
	rpDC := contractapi.NewDataCollector(
		"[YOUR ACCESS KEY]",
		"[YOUR SECRET ACCESS KEY]",
		contractapi.DCOptions{
			Debug: true,
		},
	)
	contract.RpDataCollector = rpDC
	contract.BeforeTransaction = rpDC.RpBeforeHook
	contract.AfterTransaction = rpDC.RpAfterHook
	// Ravenpod

	assetChaincode, err := contractapi.NewChaincode(&contract)

	if err != nil {
		log.Panicf("Error creating asset-transfer-basic chaincode: %v", err)
	}

	if err := assetChaincode.Start(); err != nil {
		log.Panicf("Error starting asset-transfer-basic chaincode: %v", err)
	}
}